Thursday, March 29, 2012

Some finished projects

Do you ever get to that place where you have all these sewing deadlines but the last thing you have any want to do is sew? That's the kind of day I am having. I am in the middle of like 20 projects, half of them need to be mailed out to people. I don't know why they are so hard to finish!

I wrapped up a couple this week. We Bee Modern and We Bee Modern Too are rolling into a new month, so I figured it would probably be a good idea to FINALLY get my March blocks in the mail. The first one is for Abigail in We Bee Modern. Abigail is kind of new to quilting and generously allowed each of us to pick a block to make for her as well as use any colors we wanted. I chose Envy on page 56 of 99 Modern Quilt Blocks.


I had a little bit of an Amy Butler throw back moment while making this block. I looove her first few lines of fabric. I also got use a little of my pez!

Heather, of We Bee Modern Too, decided to have us make blocks for a quilt that she would be donating to charity. She said that people rarely make quilts that speak to older boys, so she had us go with a black/white/red/grey color scheme. She chose Boxed In on page 34. 


The blocks we have seen so far look SO good. This is going to be a great quilt, and I am so excited that she will be donating it! She is wonderful. 

I am also participating in the Covert Robin hosted by Rachael at Imagine Gnats. Gifts have to be in the mail by March 31st so I absolutely had to wrap that up. Now I will warn you, my pictures were taken in a very unique state of mind. It was 7 am (for me that is early because I don't have kids), I had not had my coffee, and I was running late/feeling very rushed. I thought to myself, "yes, this would be a good time to photograph my Covert Robin gift. And it would be an even better idea to mail them out today so that if the pictures do in fact turn out bad I cannot take new ones." So yes, this was not my most impressive camera experience. The sun wasn't even all the way up! Anyway,


I made two hot pads for my secret gift person. She cooks a lot so I thought it would be the most useful thing I could make her. I wasn't sure what colors to use because I couldn't really ask what colors she likes, as per the rules, so I just went with brights. Hopefully she will like them! And they will definitely look better in person. Haha.

Back to my evening of knowing I need to sew, but having no motivation. Tomorrow is a new day and things will get done! (I hope) But for now, I am giving in and taking up residence on the couch with some ice cream. O, and my roommates...


Sunday, March 25, 2012

Japanese x and + tutorial

One more week until the official kick off of the Retro Flowers Quilt Along! I hope you all will join us!! Now is the time to pick out you beautiful fabrics, get your supplies ready, and join the fun in the flickr group. For all of the information on schedule, prizes, and more, go here! Until then...

I have been hunting around the internet for a good tutorial on the Japanese x and + block finishing at 12.5 inches. Much to my dismay, I could not find one. I decided to backwards engineer it and I thought I would share what I came up with!

Here is my final block, finishing at 13 x 13 (12.5 x 12.5 once it is sewn to its neighbor blocks)


My pictures came out like I was using a fish eye lens...weird. Anyway, this is the first cut I have made into my Good Folks and man was it nerve wracking. 

So after some careful math, I figured out that you need:

(8) 3 inch squares for the triangle pieces (blue in my block)
(4) 3 inch squares for the ends of the plus (yellow in my block)
(2) 3 inch squares for the plus (red diamonds)
(1) 8 x 3 inch rectangle for the plus (red diamonds)
(4) 5.5 inch squares for the x pieces (I chose 4 different prints to make it scrappy)


I started by piecing the x part of the block. Each 5.5 inch square will get (2) 3 inch squares sewn into opposite corners like this. I sewed a vertical seam from the top corner of each blue square to the bottom of each. 


Next, iron the squares back onto themselves (wrong sides together) and cut away the excess fabric like so


Next, I sewed together the pieces of the plus part of the block using a 1/4 inch seam. I ironed my seams open mainly because I prefer the look. You can press them to the side as well.


After that, I sewed 2 of my 5.5 inch squares to each of the shorter plus pieces. This is where you have to get careful about placement. You want to make sure the 'points' of your x pieces are pointing towards your main plus color. In mine, I made sure my x pieces were pointing to the red diamonds, as opposed to the yellow. 


Finally, I sewed each of those pieces to the final portion of the + part of the block. 


I really like the scrappy look of it! It was a super easy block with some very fast piecing. I have seen people use color and fabric in numerous ways for this block, but I find the scrappy ones to be the most interesting and striking. 

Tuesday, March 20, 2012

A Few More Things

So I just set the fire alarms off in my apartment building. Mortifying....

Anyway. There are a few extra details that I thought I needed to include as I sat at my desk all day. Needless to say, I was not concentrating well. First, I only briefly mentioned Jill of Made on Main Street, the wonderful woman who makes the acrylic templates for this pattern. If you are looking for a method of cutting that is quicker than freezer paper, definitely scoot over to her site and grab those. I have them, and they are great! On Thursday, she will be doing a giveaway for some free ones. You don't want to miss that opportunity!

If you do buy them (or win them!), you might also consider some Invisigrip for the bottom of them so they don't slip (although not imperative), as well as a 28mm rotary cutter. It's like the regular rotary cutter's little sister. It is super cute and super necessary for turning the curves of the templates. I would hate for anyone to be missing things that would make life easier when we get started!

Also remember, tomorrow Christina will be giving away 5 patterns on her website!!! Definitely visit her. You wouldn't want to miss that. I will keep updating if I think of anymore important things, but that should be it. Bianca's first post about templates and cutting will give you tons of tips and tricks on the best way to get all of your fabric cut out pretty efficiently. Get excited for that! While you are waiting, be sure to check out our other blogger friends and join the flickr group! Feel free to post pictures of your gorgeous fabric choices. We would all love to see!

Thanks again to everyone participating! We are excited to have you and very excited to get started!

Retro Flowers Quilt Along

I am pleased to announce that the surprise I have been planning is the Retro Flowers Quilt Along! I will be hosting it with Bianca of Sweet Diesel Designs. We will have prizes courtesy of Fat Quarter Shop throughout the process as well as some final product prizes at the end! Everything you need to know can be found here, but I will give a quick overview in this post as well! I hope you all will join us in this fabulous quilt along!

Christina's (The Sometimes Crafter) gorgeous quilt

Pattern: The pattern can be purchased here for only $10. It will show up in your email immediately upon purchase, and you won't have to spend any time waiting for it to arrive! You must buy the pattern to participate in the quilt along. We will not be providing templates or any specific instructions found in the pattern.


Schedule of posts:
4/9: Sewing Curves - Megan
4/23: Piecing Blocks - Bianca
4/30: Piecing the Quilt - Megan
5/7: Quilting By Machine - Bianca
5/14: Quilting By Hand - Megan
5/23: Wrap Up and Linky Party Opens!
6/1: Submission Deadline for Grand Prizes


Prizes: We will be giving out a total of 5 prizes. 2 will be given away on our blogs sometime in April. These will be a jellyroll of your choice from Fat Quarter Shop! To enter to win these, all you have to do is become a follower on our blogs! Thats it! The other 3 grand prizes will be given out at the end of the QAL. One winner will be picked by Christina as the quilt that she feels most embodies the way she envisioned the pattern. The other two winners will be picked by myself, Bianca, Nova of A Cuppa and A Catch Up, and Rachel of Stitched in Color as the quilts with the best and most modern use of color and fabric. All 3 of these winners will get a $75 gift certificate to Fat Quarter Shop!


Flickr Support Group: Please also join us on Flickr! Here everyone can upload photos of their progress and discuss relevant topics. It is a great forum to express any problems you run into and receive help from the whole group! It is also so fun to see all of these beautiful quilts come together! Definitely hop over and join us!

The Button: If you are planning to participate or would just like to promote us, grab this button from my sidebar! We would love to see it on your blog!


Many of our blogger friends have agreed to give us a shout out post to kick this quilt along off right! Hop on over to their blogs and check them out. They are all very talented and full of fabulous ideas and creativity!

3/20: Stitched in Color -Rachel
3/21: The Sometimes Crafter - Christina (who will be giving away 5 free patterns on her blog in honor of us using her pattern! Get over there quick!!)
3/22: Made on Main Street  - Jill (who will be giving away 3 sets of acrylic templates on her blog!! Hurry over there too!!)
3/23: A Cuppa and A Catch Up - Nova
3/24: I'm a Ginger Monkey - Katy
3/25: Lucy and Norman - Megan
3/26: Ellison Lane Quilts - Jennifer
3/27: Imagine Gnats - Rachael
3/28: Mama Love Quilts - Nicole
3/30: Knotted-Thread - Jennifer
3/31: Life's Rich Pattern - Annabella
4/1: Pajama Mama - Kristen

Again, if you need any more detail...particularly on the prizes and how to enter...click on the 'Retro Flowers Quilt Along' tab at the top of my page or here

We hope you will join us and can't wait to get started!!!!

Sunday, March 18, 2012

A Present

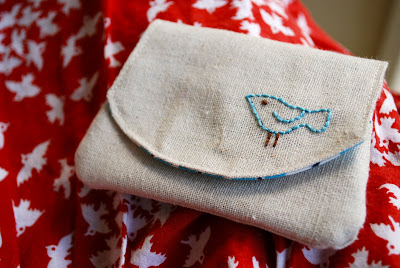
Now that I have had time to sew, I have started making presents to thank all of the people who have sent me wonderful treats over the past few weeks. This one is for Heather who sent me a fat quarter of a piece of the Good Folks line that I didn't have. I know her from one of my bees, and she is just super sweet. Hopefully she likes it!


The pattern is called Little Wallet by Valori Wells Designs. It was super quick and really fun to make. The inside has three little pockets and a snap closure. 


Heather, it will be coming your way soon!

Also, don't forget, T-minus 2 days until the beginning of the awesome surprise I have been planning. You know you want to be here for it!

Thursday, March 15, 2012

It's HERE!!

My Flea Market Fancy has arrived!!! I have been dreaming of a re-release for years and it is finally here.


I got the email from Hawthorne Threads about a month ago that it was going on pre-sale. Silly me waited until after I got home from work and had dinner to sit down and buy it. 3 of the prints had already sold out. SOLD OUT!! On Pre-sale!?! I was so sad. Naturally I quickly ordered the other 18 and went on the hunt for another shop that was taking pre-sale orders. I woke up a few days later (still not having found my fabric) and saw that Hawthorne Threads was doing a second round of pre-sales. YAY! The email had come out the night before, after I had gone to bed, and I had missed my 3 fabrics again!!! AGAIN! I was horrified.

Finally I found those lovely prints at Hart's Fabric, which I had never heard of before. They are really great by the way! Very easy to get in touch with and great customer service. Anyway, long story short, I had to send my fabric to my parents house since I didn't know when it would be released or where I would be living. It arrived yesterday, and I was in the car not long after. Yes, I drove 3 hours home just to get the fabric that I have been patiently waiting for. Haha. I am still waiting for the 3 from Hart's Fabric, but I have the bulk of it and I am o so very happy. I also had a present from my friend Christina at home waiting for me. She is just wonderful!! (If you haven't been to her website definitely go. So inspiring!!)

Also, if anyone has any of the out of print pieces of FMF and would like to swap, do not hesitate to ask!

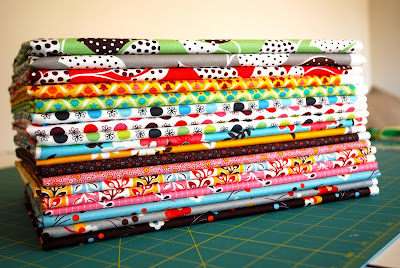
Well now that I have made it perfectly clear that I have a weakness for FMF, I will give you something a little more interesting. I have started folding my fabric (1 yard or more) onto these cute little mini bolts. They make actual mini bolts (for this purpose), but they are rather expensive. I just bought comic book boards because a pack of 100 is only $5.99 or so. I bought the Image Guard brand, but there are tons of other choices out there. They are great for fabric because they don't contain any sort of chemicals that might leach into or harm the fabric (I mean if they are safe enough for comic books, they are definitely safe enough for fabric). So anyway, I bought the 'magazine size' which is 8.5 x 11 (inches) rather than the 7 x 10.5 because I didn't want any fabric left hanging on the top or bottom.


You can see how neat and tidy it leaves your fabric. They are so easy to stack and smaller pieces of fabric will no longer get sucked in and lost between the bigger pieces of fabric. You can put half yards on as well, but I just toss them in the bins I made for fat quarters. I have more room there than I do on my shelves.


While I am sure all of this organization is thrilling (not), I will definitely be back creating something in my next post. I have been so busy between the move and planning the surprise that I haven't even turned on my machine! I am totally going through withdrawals. Until then, its back to planning. Remember March 20th! It will be very exciting!

Tuesday, March 13, 2012

Missing In Action

I apologize for being silent this past week, but I was moving. Hooray! I am officially a Raleigh resident and a very happy person. It is wonderful here, and I already feel so at home. I have spent the past few days busily unpacking, which I detest. I wish the stuff would unpack itself. O well. Obviously, I got my sewing room put together first. Haha. You can see that I still have some piles of stuff, but its coming together.


Please excuse my pictures, the flash was not cooperating, and I just gave up. I am so excited to use my design wall. My dad made it for me, and it is perfect!

Hopefully now I will be able to sew something fun to post about! Until then, it is back to unpacking. The rest of the house is not nearly as complete as the sewing room.

Also, make sure to come by on March 20th. I will be doing the big reveal of the exciting surprise that I have been working on! It is going to be so fun, you don't want to miss it!

Tuesday, March 6, 2012

My Scrap Attack Quilt

Before anyone gets any ideas, I did not complete this in the midst of my packing. Haha. I finished it this past winter (Jan 2012), and thought it would be a great addition to the Scrap Attack that Rachel is hosting on her blog.


The quilt is from the book Material Obsession. It was one of the first quilting books I ever bought, and this pattern just totally struck me.


The blank squares below (oh and by below, I mean above.....it was held upside down) the flowers (or stars) are supposed to get appliqued leaves and embroidered stems after it is quilted, but I like them blank. I don't know why. So I think I will leave them that way :)


I do love it though and can't wait to have it finished so I can snuggle under it!

Monday, March 5, 2012

My Ironing Board was GROSS

I have had the same cute little ironing board since I went to college. It lived with me through 4 years of roomates and lord knows what else. It also has gotten some pretty heavy usage since I have been out of school and have been sewing much more consistently. At this point it is so gross and stained, I refuse to even put a picture of it up.

So amidst my packing yesterday, I decided that it needed to be recovered, and NOW. Rachel, from Stitched in Color has a fabulous tutorial on how to do just that. I got out my handy staple gun (that I am so proud of myself for owning), an old towel, and some pretty Amy Butler fabric that I had been hoarding, and went to work.

The first order of business was peeling off the old cover which was less than fun. Whatever padding was underneath there had begun to disintegrate. Ew. Once that was taken care of, I used the wooden board to trace and cut my towel and my fabric.


Don't you love apartment carpet? Anyway, then pretty much all you have to do is layer the pieces like so


and get to stapling, like so. 


It is best to start on the sides of the ironing board to make sure that you are pulling the layers tight enough around the board so that you get a clean finish on top. Then you slowly work your way around the nose of the board, again, making sure to pull everything super tight before you staple. Then you finish up the other end and you are good to go!


Ah, crisp clean new ironing board, I love you so. I can't wait to get moved and do a project on it now!

Friday, March 2, 2012

Getting Organized

I am taking the opportunity in setting up a new sewing room to attempt some organization. I found a 12 pack of mason jars at Walmart for only $7! Mason jars alone are really useful, but I wanted mine to be cute as well. This is what I came up with.


I am pretty positive I am not the first person to think of this, but I like the idea! I also figured out a pretty simple way to do it. All you need is a mason jar used for canning (meaning the lid has 2 separate pieces: top and ring), a hot glue gun, a scrap of beautiful fabric, a little pillow stuffing, and some scissors. 

I cut my scrap of fabric with a radius approximately one inch larger than the top of the jar. The fabric needs to be bigger than the top of the jar because it is going to end up being 3D rather than flat once it is filled with stuffing.


I will warn you in advance, I don't have a helper, thus I could not take pictures of myself gluing or actually performing some of the steps. If you are trying to do this and anything is unclear, do not hesitate to ask questions!

Ok so, I found the easiest way to go about this was to place the fabric on top of ring (right side toward the ring) and then the stuffing on top of the fabric. We are not gluing anything yet because you want to make sure you have enough stuffing to make your pin cushion appropriately dense. 


Then you push the 'top' piece of the jar lid down on the other layers. This should sandwich your fabric and stuffing between the two layers of the jar lid. In my picture, I am pushing it onto a hard surface. This was merely to allow me to use my other hand to take the picture. It works better if you hold the ring in one hand and push the top with the other. That way the fabric and stuffing are free to push out the other end. Make sure to push the top in until it sits firmly up against the ring. If you don't feel that you have enough stuffing, add some more and test drive it again until you are satisfied with the shape and density.

On to gluing. After you are comfortable with the amount of stuffing you have added, you want to tack the fabric down to the 'top' part of the jar lid. It is best to do this while it is inside the ring to retain your shape. Just dab hot glue underneath the edges of all of the fabric that is sticking up. The end result should look something like this.


Now, we still have not glued what I refer to as 'the poof' into the ring itself so you should not have any trouble popping it out like so.


You can then quickly run a line of hot glue around the inside of the ring. You will see that there is a lip that your poof (or normally the top of the lid) would sit on. This is where you want to put your hot glue. Then you quickly shove the poof back into the ring, and press it firmly against the lip of the ring until the glue sets. When you flip it over, it should look like this!


Once that is done, the jar is free to be used as decorative storage! These are great for thread, scraps, buttons, beads, zippers, you name it. You don't even have to use the 'poofs' as pin cushions. They can be labels or identifiers so that you can keep your jars organized. Personally, I can never have enough places to stick pins. I find myself desperately searching for anywhere to put them while I am mid project. Haha. Hopefully you'll be able to create some great storage solutions with this fast and easy project!